Mum wants to hijack my blog to publish a knitting pattern she has designed and written. I shouldn't let her do it but she isn't very tech savvy and she doesn't know how else to link it to her Ravelry account. She no longer has a blog of her own (deleted her old email address and locked herself out of the blog - stupid woman - but you can see the remnants of it here Mum's Baking Blog)
I'm making this as difficult as possible for her - sleeping with my face on the lefthand end of her keyboard. She has SHIFT and CTL on the other end but I have control of the letter A and my chin on the Caps Lock. She is very persistent, but she still hasn't worked out how to make it into a downloadable .pdf (edit - oh yes she has Mr T -a lot can happen in 24 hours!)
Oh alright then put it here but I disown the content from here on (unless there is money for catfood in it.......)
pattern as .pdf file
 Materials: 2 skeins Lanas Stop Normando (band
colour) and 4 skeins Filtes King Koko
(body colour) – for jacket and hat and a pair of size 7.5mm straight needles
Materials: 2 skeins Lanas Stop Normando (band
colour) and 4 skeins Filtes King Koko
(body colour) – for jacket and hat and a pair of size 7.5mm straight needles

I'm making this as difficult as possible for her - sleeping with my face on the lefthand end of her keyboard. She has SHIFT and CTL on the other end but I have control of the letter A and my chin on the Caps Lock. She is very persistent, but she still hasn't worked out how to make it into a downloadable .pdf (edit - oh yes she has Mr T -a lot can happen in 24 hours!)
Oh alright then put it here but I disown the content from here on (unless there is money for catfood in it.......)
pattern as .pdf file
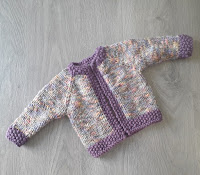
Koko Jacket
and Hat

Abbreviations:
K = knit
(right side facing)
P = purl
(wrong side facing)
PM = place
marker
(Band) = 3
seed stitch in band colour
psso = pass
slipped stitch over

Jacket:
Cable cast
on 37 with 7.5mm needles plain
colour (Lanas Stop – Normando)
Row 1: K1, *(P1,
K1) – repeat *(..) to end
Row 2: P1,
(K1, P1) – repeat *(..) to end
Row 3: As
Row 1
Keeping 3
stitches each side in seed stitch for front bands proceed as follows:
Row 4: (Band)
then P4, PM, P6, PM, P11, PM, P6, PM, P4, (Band)
Row 5:
(Band), introduce body colour, knit, increasing one stitch each side of every
marker slipping the marker as you go (8 extra stitches in the row), (Band)
Make sure
body colour and band colour are turned around each other at start and end of
every row.
Row 6:
(Band) Purl, (Band)
Repeat rows
5 and 6 until there are 15 stitches on each front section (7 repeats)
Next Row:
(Band) knit to marker increase 1 AFTER the mark, *(knit to next mark increase 1
each side)*, repeat *to*, knit to next mark and increase 1 BEFORE the mark,
knit to end (Band)
Next Row:
(band), Purl, (Band)
Divide for sleeves: (knit the sleeves before the body)
Next Row
(right side facing): (Band), knit to
first mark (remove the mark put these stitches on a holder), Cast on 1, knit
22, remove the mark, turn
Next Row
(wrong side facing): cast on 1, purl to end.
(24 stitches)
Keeping in
stocking stitch, decrease one each side on every 4th row until 16
stitches remain, end with a purl row and put the stitches on a holder.
Return to
the main body, join body colour, knit across the back, (remove the mark put
these stitches on a holder), Cast on 1, knit 22, remove the mark, turn. Make the second sleeve the match the first.
Return to
the main body, join body colour, knit across the right front (Band), turn
The Body from armholes down:
Wrong side
facing: (Band), purl right front, cast on two under arm, purl back, cast on 2
under arm, purl left front (Band)
Continue in
stocking stitch to band width short of desired length, finish with wrong side
row. Turn.
Bottom Band:
Next row
(right side facing): (Band) continuing in band colour knit across to centre
back, knit 2 together, knit to band, seed stitch the last three using the same
strand of yarn.
6 rows of
seed stitch.
Cast off.
Sleeve bands: one row knit in band colour, 6 rows of seed
stitch, cast off.
Sew sleeve
seams and under arms. Weave in the
ends. Add a front zip or toggles
according to your preference.
Hat
Cast on 48
stitches of band colour , knit one row and work 12 rows of seed stitch.
Change to
body colour and work 6 rows of stocking stitch.
Next row
(right side facing): *(knit 2 together, knit 6) repeat from * (..) to end (42
stitches)
Next row:
Purl
Continue
decreasing 6 stitches evenly spaced on every knit row until 30 stitches remain.
Next
row: *(slip one, knit 2 together, psso,
K2), repeat from *(..) to end (18 stitches)
Next Row:
Purl
Repeat the
last two rows (6 stitches)
Next row:
K2 together across the row – 3 stitches continue in i-cord for 30cm, bind off
and add a tassel. Sew up the hat seam.
Like to get this pattern in a bigger size like a size 2
ReplyDeleteCan I get this pattern in a size 2
ReplyDeleteI'm afraid I made it up as i went along and according to the amount of yarn I had. If I had to make up one size bigger i would add a stitch to each front section, 2 to each sleeve and 2 in the back, and i would do it by making one extra increase row before dividing up for sleeves and front etc. That would create a slightly deeper raglan armhole, and a small amount of extra width in body and sleeves. Then i would follow the pattern down and make the body and sleeves longer as required. Judging from sewing patterns I use, body width increases very little from 1 to 2 (2.5 cm, an inch or so) but length is the bigger adjustment you need to make.
DeleteThanks
ReplyDelete